Videos generally take about as long as their duration to process in standard definition and double the duration for high definition, so a 5-minute video would be available for playback in SD mode in about 5 minutes and in high definition in about 10 minutes. Autocaptions are generally available within one hour for all but the longest videos.
Kaltura
Kaltura is a comprehensive, robust, campus-wide video platform, available to all faculty, staff, and students at NIU. With Kaltura, users can upload, publish, share, and edit videos, as well as create screen recordings, in-video quizzes, and other kinds of interactive learning experiences.
Kaltura is embedded tightly with Blackboard, allowing a simple workflow for instructors building video-based course content and a seamless video experience for students, as well as providing rich analytics, gradebook integration, and automatic closed captioning. Hosting content using Kaltura has the added benefit of providing a media rich course without affecting your Blackboard course quota.
Features of Kaltura
- Upload, store, and share your existing video content, created outside of Kaltura (PowerPoint to MP4, smartphone video, tablet recordings).
- Create and share quick webcam/microphone videos for introductions, micro-lectures, video feedback.
- Create and share screen recording videos by recording webcam, screen and/or narration. This is useful when creating recordings of anything on your screen such as software demonstrations of data analysis tools, coding interfaces, design tools and website tours, narrated document reviews (detailed project document, course syllabus), and a workflow for creating a narrated presentation using PowerPoint or another presentation tool.
- Incorporate YouTube videos into your Kaltura media library and embed and play through the Kaltura player in Blackboard.
- Take advantage of excellent automatic closed captioning, with simple caption editing and video transcripts.
- Edit videos in Kaltura, create video quizzes, and branching video experiences.
Using Kaltura in Blackboard
See the Quick Guide Create and Share Video Content in Your Courses using Kaltura for more detailed instructions for adding, creating, and sharing content using each of the main Kaltura features.
Creating/Adding Content to your Kaltura My Media Library
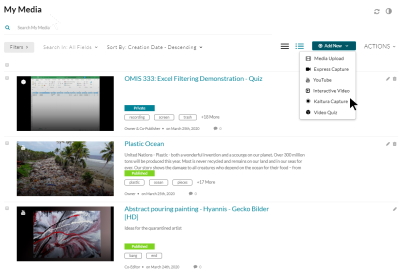
To begin using Kaltura in your Blackboard course, log into Blackboard and (instead of clicking Courses) choose the Tools area from the left navigation. On the Tools page, click Kaltura My Media. Then, click the Add New button to create new content.
Incorporating Content from your Kaltura My Media library in your Blackboard Course
Creating a Link to a Video
Once you have content in your Kaltura My Media library that you want to share in your Blackboard course(s), click the Courses link from the left navigation in Blackboard and navigate to the target course.
- Click the plus sign (+) where you would like the video to be placed
- Choose Content Market
- Click Kaltura Video
- Click the blue Embed button next to the video you want to add to your course
Embedding a Video in a Document
You can also add content to an Ultra Document by adding a Content block and using the Insert button on the text editor toolbar to access the Content Market.
- Click the plus sign (+) and choose Create and Document
- Edit the title of your Document and then click the Add Content button
- In the text editor, click the plus sign (+) at the far right of the toolbar (Insert Content)
- Click Content Market
- Click Kaltura Video
- Click the blue Embed button next to the video that you want to add to your course
Students Using Kaltura
In addition to interacting with course content, students can take advantage of the same tools and features to create their own content for presentations, projects, assignments, performances, and other activities in your course. See the guide for Submitting Videos to Blackboard for step-by-step instructions. You can share this link with students or copy and modify the instructions to fit your course activities.
Frequently Asked Questions
Creating, Hosting, and Sharing
Assuming you captured or recorded in clear high definition, this is most likely due to processing that is still occurring. This is often most obvious with intricate screen recording subjects such as Excel. If you have just created or uploaded your video, it will take up two or three times the duration of the video for a high definition version of the video to be available.
If you are planning a recording, consider the guidance in "24 tips for Creating High Quality Screen Recordings" for high readability, high impact screen recordings.
If you are the video owner or are a co-editor, you can download an MP4 of your video by entering edit mode.
- Login to MediaSpace or Blackboard/Kaltura My Media.
- Click the title of the video you'd like to download.
- Click Actions and choose Edit.
- While in Edit mode, at the top right corner of your video, click the Download button to begin the MP4 download.

No. For video content, the only download format is MP4. If the original media was an MP3 file, downloading would of course be an MP3.
If you are interested in extracting audio from a video stored in your My Media library and willing to install a small piece of software, first download your video as an MP4, and then use VLC video player to extract an MP3.
To share an unlisted link to a video uploaded or created in Blackboard My Media or in Mediaspace, access your video from the My Media section of Mediaspace, set the permissions to unlisted, and copy the URL for the video. See more details on the Sharing Media with Mediaspace page.
If you are migrating a media file that has an existing caption file, such as an SRT file, that was created or improved by a human captioner, you should upload this caption file to Kaltura to replace the Kaltura machine captions. If your media was only machine captioned by another system, the captions are likely lower quality than the machine captions provided by Kaltura.
To replace the machine captions in Kaltura with an SRT that has been created or improved by a human captioner:
- Download or locate the existing captions file (e.g. *.srt) from the previous media host or captioner.
- Login to Kaltura via Mediaspace or Blackboard/Kaltura My Media.
- Click My Media.
- Locate the media for which you would like to replace the machine captions and click the title.
- Click Actions, then Edit.
- Click the Captions tab, then the Upload Caption File button.
- Select the captions file, edit the caption information, and click Save.
- Click the checkbox in the new caption line to set this caption file as the default for this media.
Kaltura Capture
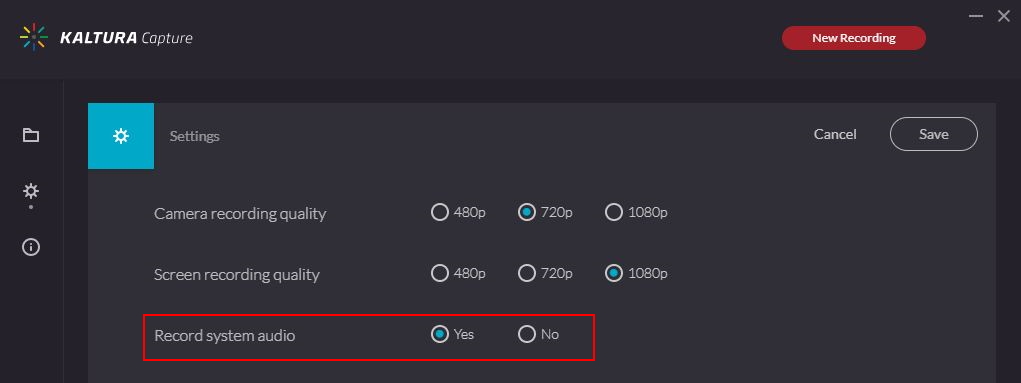
Kaltura Capture can record your system audio (e.g. sound from a video playing in your web browser) as part of your screen recording if you are using a PC. Recording system audio is not supported in MacOS.
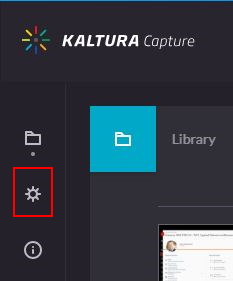
To enable system audio recording in Kaltura Capture, from the Kaltura Capture application panel:
- Click the Manage link.

- Click the Settings (gear) icon.
- Select Yes next to Record system audio and click Save.
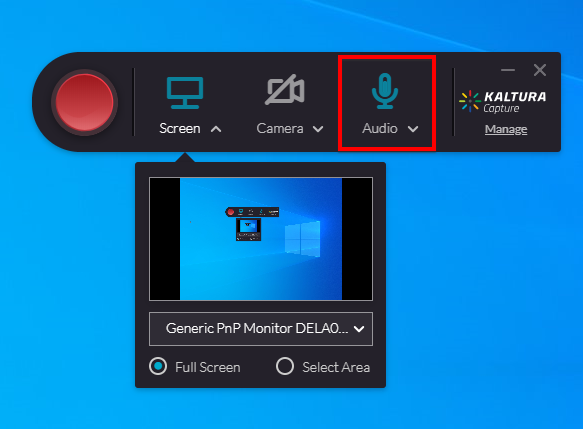
- The microphone option (Audio Button) must be turned on in the Kaltura Capture panel for system audio to be recorded. If you are only capturing system audio and do not want to capture sounds picked up by the microphone, use a USB headset microphone with a mute switch/button.
Beginning with Mac OS X Catalina, applications that record the screen need special permission in the Security and Privacy area of the Settings panel. Without this, you may see odd behavior such as the Capture will not stop recording, the application will not capture the screen, or strange MacOS security messages.
To grant permission for Kaltura Capture to record the screen in Mac OS X Catalina:
- In System Preferences, click Security & Privacy, then General.
- Unlock the padlock.
- Choose "App Store and identified developers".
- Lock the padlock.
- In System Preferences, choose Security & Privacy then Privacy.
- Choose "Camera" and Check Kaltura Capture.
- Choose "Microphone" and Check Kaltura Capture.
- Choose "Screen Recording" and Check Kaltura Capture.
- Lock the padlock.
Kaltura Capture runs on Windows or MacOS only. Options for recording the screen include built-in recorders in iOS and Android, downloading a screen recording app from the Apple Store or Play Store, or using a tool such as Explain Everything to record a narrated whiteboard interaction. For a demonstration of Explain Everything, see the videos below.
Yes. As you may know, Flash will no longer be supported on any mainstream browser after December of 2020. Using Kaltura Capture on a Windows PC will allow you to capture the screen video and audio generated by a slide-based presentation published in Flash while you are still able to play it. This video will then be stored in MP4 format in your Kaltura My Media library. MacOS does not allow the capture of system audio and would therefore not be a good option for recording media with audio.
Kaltura Capture will not duplicate interactive features such as buttons or sliders in a more complex/interactive Flash-based animation/project. See the Migrating Flash-Based Presentations to Kaltura page for more details.
No. The settings you configure Kaltura Capture with (such as input selection, microphone and camera selection) are not modifiable until you stop recording and begin a new recording session.
The ability to do this has been submitted to Kaltura as a feature request.
Not currently. At this time, the downloadable MP4 will be of the video designated as primary (generally the desktop recording). Kaltura is investigating a solution for this.
Yes. Kaltura Capture can work with any video feed available on a user's computer, including webcams, digital cameras and camcorders, and digital microscopes. See this video for a discussion of the use of a document camera with Kaltura.
There are several reasons that a Kaltura Capture recording may fail to upload successfully, including an interruption in Internet access, a memory issue on the computer, or an encoding error. When one of these occurs, occasionally, the upload will stall (often at 10%). Try these strategies, in this order, trying to upload after each.
Strategies for Restarting Upload in Kaltura Capture
- Quit and restart Kaltura Capture. Be sure to check the system tray in the lower right corner for the Kaltura Capture icon. If the icon is present, right mouse click and quit the application.
- Restart your computer.
- Uninstall and reinstall Kaltura Capture.
If none of these strategies works, you may use the instructions below to upload the content manually. Contact CITL for further support assistance with the proper functioning of Kaltura Capture.
Upload Kaltura Capture Recordings Manually
- Locate the local storage area for recordings.
- On a Windows Computer
- Open a File Explorer or Windows Explorer window.
- Into the path bar, type or copy/paste: %LOCALAPPDATA%\Kaltura\Capture\Recordings.
- Press Enter.
- On a Mac
- Open a Finder window.
- Open Finder's Go menu.
- Choose Go to Folder...
- Type or copy/paste: ~/Library/Preferences/Kaltura/Capture/Recordings.
- Click the Go button.
- Review the MP4 files in the folder, using the date and time to locate the recording you wish to upload. Double click the file to preview if necessary.
- In a browser, login to Kaltura via Mediaspace or Blackboard Kaltura My Media
- Click Add New, then Media Upload
- Drag the appropriate MP4 from the local storage location to the drag and drop area of the Media Upload screen.
- On a Windows Computer
In addition to uploading automatically, your Kaltura Capture recordings are stored locally on your computer. Use these instructions to find the recordings.
Local Storage of Kaltura Capture Files
- Locate the local storage area for recordings.
- On a Windows Computer
- Open a File Explorer or Windows Explorer window.
- Into the path bar, type or copy/paste: %LOCALAPPDATA%\Kaltura\Capture\Recordings.
- Press Enter.
- On a Mac
- Open a Finder window.
- Open Finder's Go menu.
- Choose Go to Folder...
- Type or copy/paste: ~/Library/Preferences/Kaltura/Capture/Recordings.
- Click the Go button.
- Review the MP4 files in the folder, using the date and time to locate the recording you wish to review, edit, or upload.
- If desired, right mouse click the file and choose Rename to give the file a more meaningful name.
- On a Windows Computer
Video Editing and Interactivity
Kaltura does not have a video combine feature. If you need to combine two or more videos, consider downloading the MP4s and using a desktop video editing tool such as iMovie (on MacOS) or MP4Joiner, merge them into a single MP4 and then re-upload to Kaltura. See demonstration using the open source tool MP4Joiner below.
This functionality has been submitted to Kaltura as a feature request.
Yes, SRT files created/edited elsewhere can be uploaded and associated with your videos in Kaltura.
To upload an SRT file from your computer to Kaltura:
- Login to MediaSpace or Blackboard/Kaltura My Media.
- Locate the media that has captions you want to modify, click the title to open its media page.
- Click Actions and Edit.
- Click the Captions tab and then the Upload captions file button.
- Select your SRT file using the Browse button, select the language of the caption file, estimate its accuracy, and provide a label.
- Click Save.
- Kaltura will add your newly uploaded caption as a row on the captions page, click the checkmark icon to Set as default.
- Once you have finished, click the Details tab, then Save and Go to Media to save your changes.
See the video below "How to Edit Captions" for a detailed walkthrough of caption editing.
Some human captioning assistance may be available from the NIU Disability Resource Center based on student needs and DRC workload. See the DRC Captioning page for further details.
Meeting Recordings
Collaborate Ultra recordings are videos of a Collaborate Ultra session and are by default stored in the Recordings area of the Collaborate Ultra tool within the course containing the session. Recordings might consist of a synchronous class session recording or a short informal recorded presentation or demonstration created by an instructor. Blackboard does allow you to retrieve a share link from your Collaborate recording that you can send in an announcement or post in a course. However, you may wish to move this recording to Kaltura for several reasons, including ease of access, consistent and simple embedding in courses, and to take advantage of Kaltura's editing and captioning features. The steps for downloading are slightly different in Blackboard Original View Courses and Blackboard Ultra View Courses, the steps for uploading to Kaltura are the same.
To download the recording of a Blackboard Collaborate Session in Original View Courses:
1. Login to Blackboard, choose Courses, and click the course that contains the Collaborate room in which you created a recorded session.
2. Use the left navigation to either click a direct link to the Collaborate Ultra tool if one exists, or click the Tools menu item, then the Collaborate Ultra panel.


3. On the sessions page, click the three-dot menu to the right of the session (room) in which you created the recording, choose Edit settings.
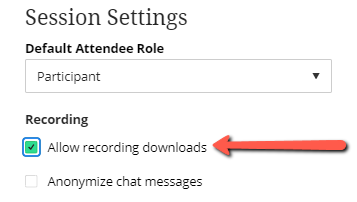
4. Under the Session Settings, Recording heading, click the checkbox next to Allow recording downloads, then click Save at the bottom of the Settings Pane.
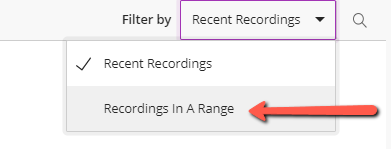
5. Click the three-line menu to the top left of the Settings banner and choose Recordings. If your recording is more than 30 days old, change the Filter by dates option at the top from Recent Recordings to Recordings in a Range, and adjust the range as needed.

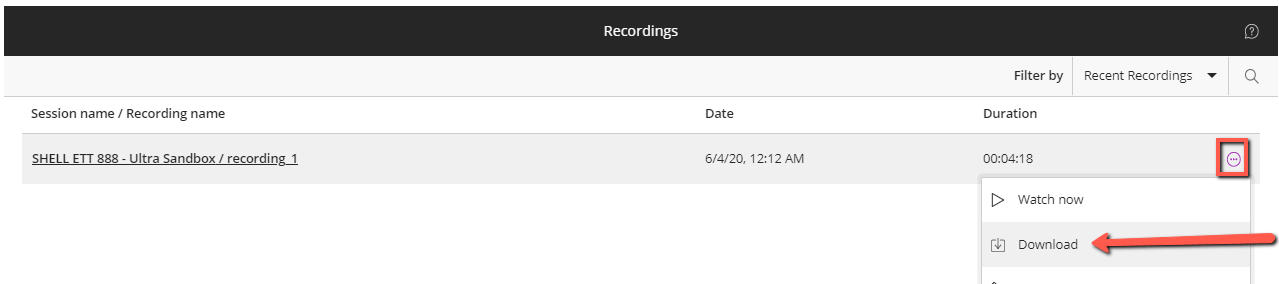
6. Once you've located the desired recording, click the three-dot menu at the far right of the recording row and choose Download. The file will download to your computer as an MP4 File. This is the file you will upload to Kaltura.
To download the recording of a Blackboard Collaborate Session in Ultra View Courses:
1. Login to Blackboard, choose Courses, and click the course that contains the Collaborate room in which you created a recorded session.
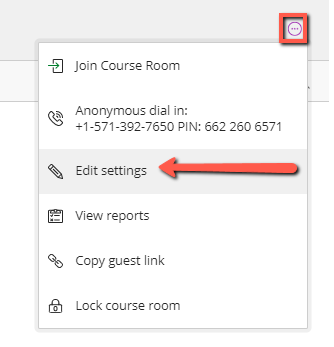
2. In the left navigation, find the Blackboard Collaborate heading, click the three-dot button just to the right of it and click Edit course room settings.
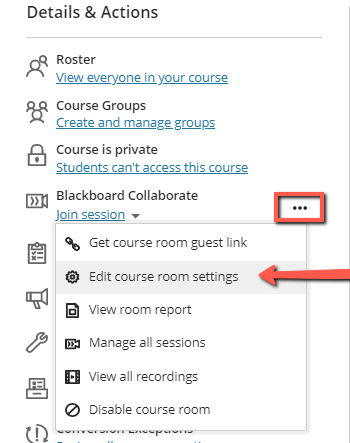
3. On the sessions page, click the three-dot menu to the right of the session (room) in which you created the recording, choose Edit settings.
4. Under the Session Settings, Recording heading, click the checkbox next to Allow recording downloads, then click Save at the bottom of the Settings Pane and close the Sessions page using the red X at the top left to return to the main course page.
5. In the left navigation under the Blackboard Collaborate heading, click the three-dot button just to the right of it and click View all recordings.

6. Locate the desired recording, click the three-dot menu on the far right side of the recording row, and choose Download. The file will download to your computer as an MP4 file. This is the file you will upload to Kaltura.
Upload the Meeting Recording MP4 to Kaltura
1. Login to Kaltura via Blackboard/My Kaltura Media or MediaSpace.
2. Click the Add New button and choose Upload Media.
3. Drag and drop the meeting recording file or click Choose a file to upload.
4. Complete the details form for the media including the media title and description.
5. Consider adding descriptive tags (words or phrases) to aid searching and categorization.
6. Use the Add Collaborator button to share co-editing or co-publishing rights with other faculty, staff, or students. Co-editors can view and modify media; co-publishers can share and publish videos in courses using Kaltura tools in Blackboard or on the web using Mediaspace.
7. If uploading via Kaltura My Media in Blackboard, do not modify the Publishing Status. If using MediaSpace, media marked Private will be visible to the content owner and collaborators only; Unlisted media will be visible to anyone with the link; Published media will be visible to anyone with access to the published destinations (such as channels and playlists displayed on MediaSpace).
9. Click Save.
10. Click Go to Media to view the media or Go to My Media to view your media library.
Microsoft Teams Meeting recordings are by default stored in the Microsoft Stream video library of the meeting host/creator. Recordings might consist of a synchronous class session recording, a business meeting or office hours session, or even a short presentation created specifically for including in a course. Stream does allow you to retrieve a share link from your My Content area that you can send in an announcement or post in a course. However, you may wish to move this recording to Kaltura for several reasons, including ease of access, consistent and simple embedding in courses, and to take advantage of Kaltura's editing and captioning features. To put your Teams meeting recording into Kaltura, you'll first download the Teams recording, then Upload to Kaltura.
To download the recording of a Teams meeting from Microsoft Stream:
- Login to Microsoft O365 with your NIU username and password. using the profile icon in the top right corner.
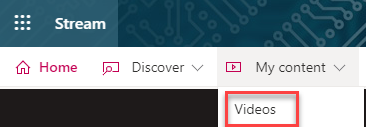
- In the horizontal navigation at the top of the page, choose My Content, then Videos.
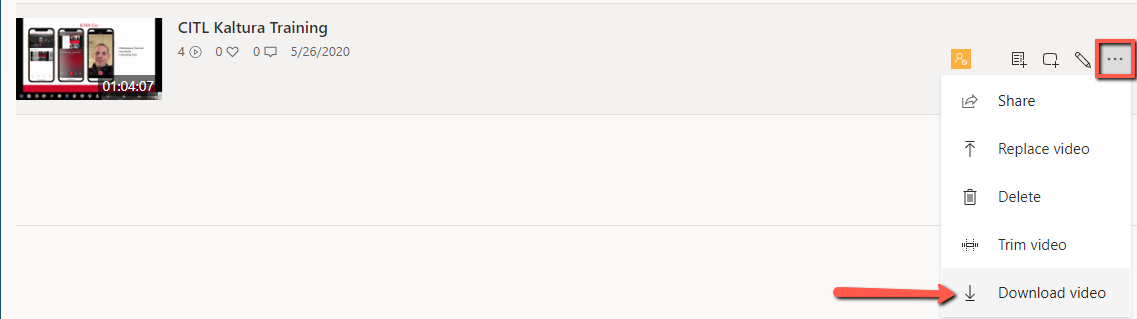
- Browse your recording list until you locate the video you want to download, click the three-dot menu to the right of the video thumbnail and choose Download, the file will download to your computer as an MP4 file. This is the file you will upload to Kaltura.
Upload the Meeting Recording MP4 to Kaltura
- Login to Kaltura via Blackboard/My Kaltura Media or MediaSpace.
- Click the Add New button and choose Upload Media.
- Drag and drop the meeting recording file or click Choose a file to upload.
- Complete the details form for the media including the media title and description.
- Consider adding descriptive tags (words or phrases) to aid searching and categorization.
- Use the Add Collaborator button to share co-editing or co-publishing rights with other faculty, staff, or students. Co-editors can view and modify media; co-publishers can share and publish videos in courses using Kaltura tools in Blackboard or on the web using Mediaspace.
- If uploading via Kaltura My Media in Blackboard, do not modify the Publishing Status. If using MediaSpace, media marked Private will be visible to the content owner and collaborators only; Unlisted media will be visible to anyone with the link; Published media will be visible to anyone with access to the published destinations (such as channels and playlists displayed on MediaSpace).
- Click Save.
- Click Go to Media to view the media or Go to My Media to view your media library.
Zoom meetings can be recorded either on the host's computer or hosts may enable Cloud Recording and thereafter store meeting recordings in the Zoom Cloud. Recordings might consist of a synchronous class session recording, a business meeting or office hours session, or even a short presentation created specifically for including in a course.
Zoom Cloud recordings can be shared by retrieving a share link from your Zoom Cloud that you can send in an announcement or post in a course. However, you may wish to move this recording to Kaltura for several reasons, including ease of access, consistent and simple embedding in courses, and to take advantage of Kaltura's editing and captioning features. To upload your Zoom meeting recording into Kaltura, first locate your recording, then use the Media Upload feature in Kaltura.
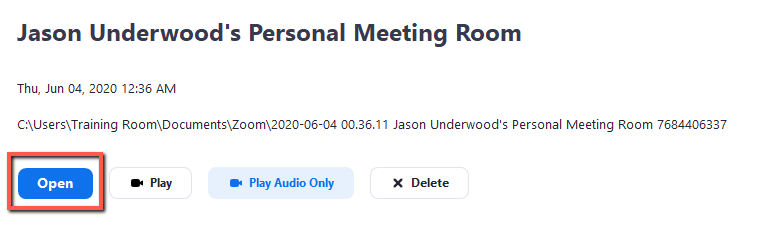
If you used the Local Recording feature:
1. Launch your Zoom app on your computer.
2. At the top of the Zoom application, click Meetings.

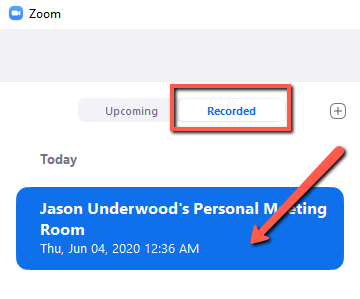
3. On the left side, switch to Recorded, click the Zoom meeting room in which you created the recording.
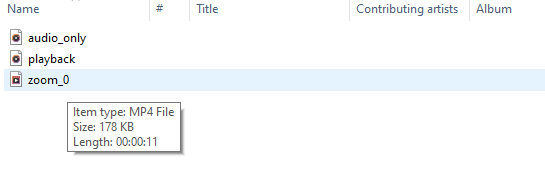
4. Click the Open button to open the folder containing the meeting recording, the recording is in MP4 format (hover to determine which file is MP4). This is the file you will upload to Kaltura.
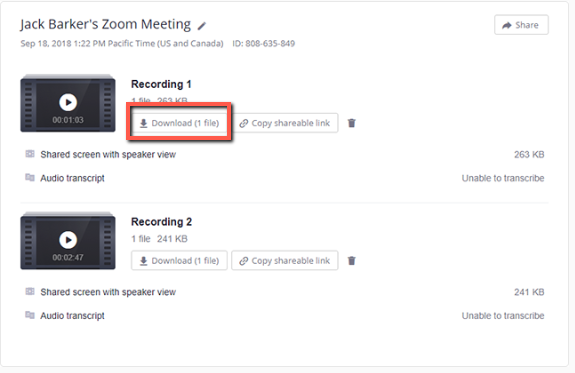
If you used Cloud Recording:
1. Login to Zoom with your Zoom user ID and password.
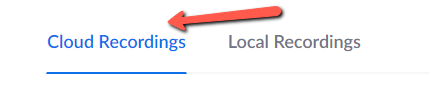
2. In the left menu, click Recordings.
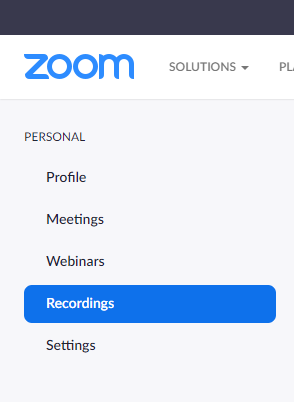
3. In the top navigation, select Cloud Recordings.
4. Locate the recording you want to download and click the Download button. The meeting will download to your computer as an MP4 file. This is the file you will upload to Kaltura.
Upload the Meeting Recording MP4 to Kaltura
1. Login to Kaltura via Blackboard/My Kaltura Media or MediaSpace.2. Click the Add New button and choose Upload Media.
3. Drag and drop the meeting recording file or click Choose a file to upload.
4. Complete the details form for the media including the media title and description.
5. Click Save.
6. Click Go to Media to view the media or Go to My Media to view your media library.
Share Your Uploaded Meeting Recording
Once uploaded and processed, you can share your uploaded meeting recording in Blackboard or outside of Blackboard using Mediaspace.
Error Messages and Malfunctions
We currently do not recommend Safari for users who use Kaltura web-based tools (e.g. Mediaspace, Blackboard Kaltura My Media, Express Capture). Safari changes web security settings frequently, causing unpredictable performance. Included here are the instructions for using the recommended browser (Google Chrome), along with instructions for the most recent version of Safari if it must be used.
Google Chrome
- Enable Camera and Microphone
- Open Google Chrome
- Go to browser Settings using the three vertical dots button in the top right corner of the browser and choosing Settings.
- Click Privacy and security
- Click Site Settings
- Click on Camera
- If listed, make sure Blackboard and Kaltura appear under the Allow category (i.e. not under the Block or Ask before accessing headings).
- If Blackboard or Kaltura appear under wrong heading, click the arrow to change to Allow
- Repeat steps for Microphone
- Allow Cookies
- Go to browser Settings
- Click Privacy and security
- Click Cookies and other site data
- Scroll down and be sure cookie settings is not set to Block all cookies. This setting should be either Allow all cookies, Block third-party cookies in Incognito or Block third-party cookies.
- Kaltura does not use third-party cookies, but many Blackboard tools do. Blocking third-party cookies is a higher level of privacy but may cause other tools and sites to misbehave.
- Scroll down and make sure Kaltura and Blackboard are not listed under the Sites than can never use cookies heading
Safari
- Enable Camera and Microphone
- Open Safari
- Click the Safari menu option in the top left of the window
- Choose Preferences, then Websites
- Under the Camera option, ensure that (if listed) Kaltura appears under the Allow category (i.e. not under the Block or Ask before accessing headings).
- If Blackboard or Kaltura appear under wrong heading, click the arrow to change to Allow
- Repeat steps for Microphone
- Allow Cookies
- Click the Safari menu item in the top left corner of the window
- Click Preferences
- Click the Privacy tab
- Click Privacy
- If checked, uncheck Block all cookies
- Prevent cross-site tracking refers to Third-Party Cookies, this option will not affect Kaltura.
- Kaltura does not use third-party cookies, but many Blackboard tools do. Blocking third-party cookies is a higher level of privacy but may cause other tools and sites to misbehave.
A combination of security changes and features beginning with the October 2019 release of Mac OS X Catalina may result in several issues using Kaltura Capture on MacOS 10.15 and subsequent versions related to system preferences. These instructions set permissions appropriately for Kaltura Capture.
Enable Camera, Microphone and Screen Recording in System Preferences (MacOS 10.15+)
- In System Preferences, click Security & Privacy, then General.
- Unlock the padlock.
- Choose App Store and identified developers.
- Lock the padlock.
- In System Preferences, choose Security & Privacy then Privacy.
- Choose Camera and check Kaltura Capture.
- Choose Microphone and check Kaltura Capture.
- Choose Screen Recording and check Kaltura Capture.
- Lock the padlock.
Some Kaltura videos embedded in Spring 2020 used an architecture that relied on third-party cookies, which help pass information from Blackboard to Kaltura. In May 2020, DoIT implemented an update that eliminated the need for third-party cookies in videos added after the update. Video publishers can prevent this error by simply republishing Blackboard links/embeds and deleting the old versions. No changes to the actual videos are necessary.
Users can also view videos by enabling third-party cookies in their browsers.
Follow the instructions for your browser:
- Chrome
- Scroll down to the Change Your Cookie Settings heading.
- Click Allow or Block Cookies for a Specific site.
- Follow the steps given in the article.
- Firefox
- Safari for MacOS
- Make sure the Prevent cross-site tracking option is unchecked.
- Safari for iOS (iPhone/iPad)
- Internet Explorer
This is a known issue in the Kaltura Quiz function related to quiz questions that are place near each other or on the same timestamp. Kaltura recommends that quiz questions be at least 5 seconds apart. If questions are too close together, the quiz may act erratically, including skipping questions or displaying an error message. If you have already created the quiz, the quiz questions can be moved to spread them out further by reopening the video editor and accessing the quiz features. If authors need assistance or guidance creating or modifying a quiz, see the Creating Quizzes page of the Kaltura support site or contact CITL at citl@niu.edu.
During times of very high demand or with large file uploads, Kaltura will occasionally fail to upload your files. Kaltura may also be performing system maintenance. While in general, you should avoid uploading very large video files (>2GB), there is no technical size limit.
You can check the status of the Kaltura system at the Kaltura Status Page. You might immediately try to upload your file or try again later. If the problem persists, contact CITL at citl@niu.edu.
Processing and Wait Times
Processing time is highly variable, depending on the size, length, and quality of the video and the demand on the system when you create or upload it. "Normal" processing is between 1 and 3 times the length of the video (e.g. an average 20 minute video may take between 20 and 60 minutes to process). At times of high demand or for very large videos, it is possible that videos may take 4 hours or more to process.
Closed captions are automatically ordered on all videos created or uploaded to Kaltura. Captions are created after the video has finished processing and are generally available 30-60 minutes after video processing is done.
Analytics
In our testing, student accounts that view videos are almost always stored in the analytics. However, Kaltura engineers have indicated that analytics in Kaltura, like analytics on other video platforms, are not designed for assessment purposes, but for viewing patterns, trends, and user data, when it is captured. While communicating some standards (no cookie blocking, using Chrome, no VPN) will increase the proper collection rate, it would still be possible for the data to be withheld from the user's computer.
As a video provider, Kaltura tries to balance collection of analytics with ensuring playback. If browsers had to be carefully tuned in this way to allow viewing with 100% analytics tracking, we would have many more issues with videos not playing.
If you need to know that students watched your videos, consider an in-video Kaltura quiz or a post-video Blackboard quiz to assess objectives addressed in your videos.
Media Storage and Retention
You will receive an email notification 30 days prior to media deletion. The message will include instructions for downloading/archiving the video content.
If you are the video owner or are a co-editor, you can download an MP4 of your video by entering edit mode.
- Login to MediaSpace or Blackboard/Kaltura My Media.
- Click the title of the video you'd like to download.
- Click Actions and choose Edit.
- While in Edit mode, at the top right corner of your video, click the Download button to begin the MP4 download.

Media content that simply needs to be archived for future use should be stored on OneDrive. When needed, content can be played back in a simple viewer from OneDrive, or uploaded to Kaltura when playback is required.
Media files can be uploaded to OneDrive for secure, long-term storage. If the content is meant to be available for playback, it can also be hosted on Kaltura for viewing.
Learn More
Workshop Recordings
- Create, Store, and Interact with Videos Using Kaltura
- Record Software Demonstrations with Kaltura Capture
Quick Guides
- Editing Videos with Kaltura
- Creating Quizzes with Kaltura
- Create and Share Video Content in Your Courses using Kaltura (Guide for Faculty)
- Create and Share Video Content in Your Courses using Kaltura (Guide for Students)
See Also...
Get Help
Technical Support and Student Help
Division of IT Service Desk815-753-8100
servicedesk@niu.edu